Stripe subscriptions are one of the fastest ways to turn a service, tool, or community into predictable monthly revenue. When you get it right, subscriptions help you achieve freedom from one-off sales cycles and multiply impact with a product that keeps compounding.
But “turning on billing” is not the same as shipping a reliable subscription system. The difference is in the details: what happens after Checkout, how access is granted, how upgrades work, and what you do when payments fail.
This guide walks you through a practical, production-ready way to implement Stripe subscriptions in a SaaS (software as a service) or membership product, without guesswork.
What Stripe subscriptions actually do
Stripe Billing can create and manage recurring charges. Your app must still decide what a customer can access.
In plain terms:
- Stripe management: Stripe handles recurring invoices, payment retries, card updates, cancellation schedules, proration math, and customer emails (if you enable them).
- App enforcement: Your app handles authentication (login), plan entitlements (features), account status, metered usage logic (if applicable), and your own product rules.
If you are still deciding whether to build a subscription app at all, start with this decision framework on custom build vs buy.
The clean architecture for Stripe subscriptions
 Stripe subscriptions work best when your app grants access based on webhook-confirmed subscription state, not on “successful Checkout” alone.
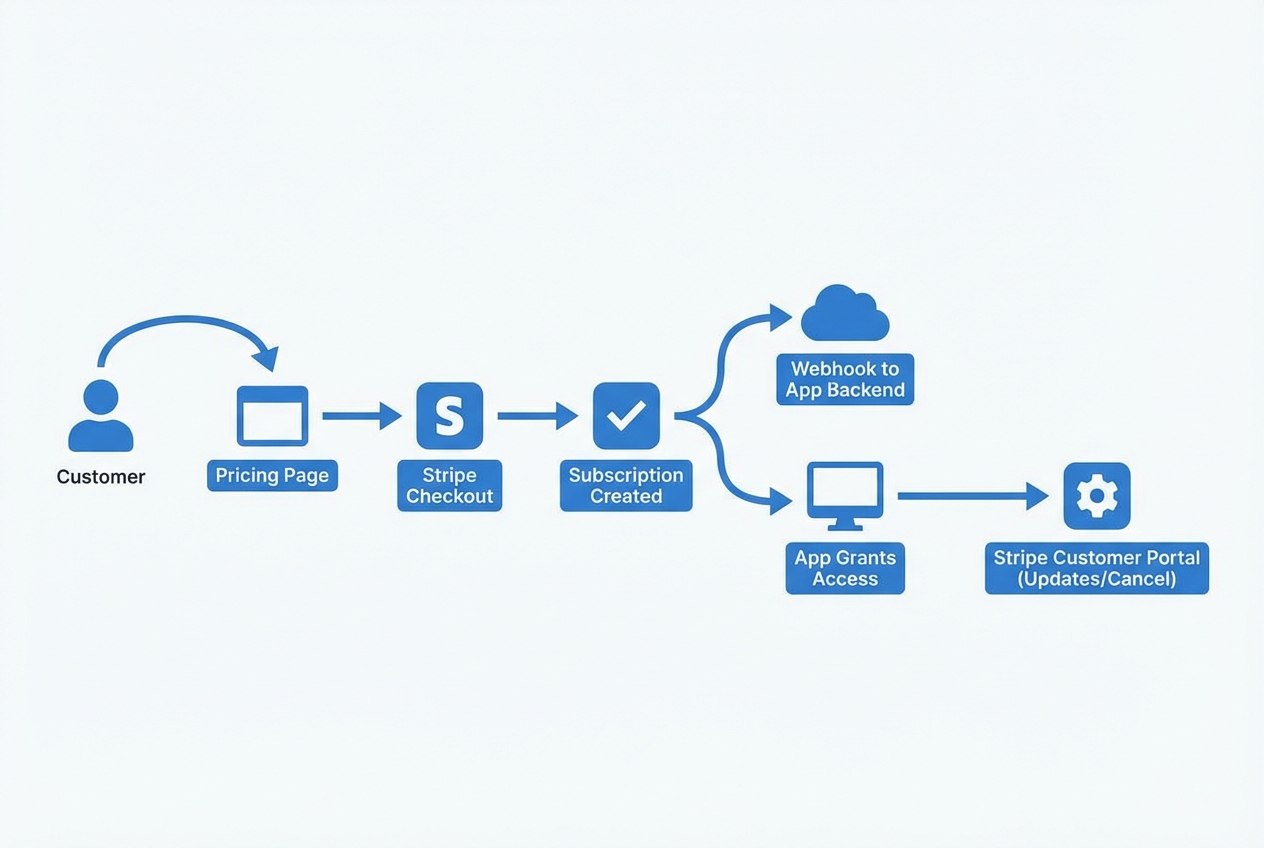
A reliable setup usually looks like this:
- Pricing page in your app: User picks a plan and sees exactly what changes when they upgrade or downgrade.
- Stripe Checkout: You send the user to Stripe’s hosted checkout to start the subscription.
- Webhook back to your server: Stripe confirms what happened (subscription created, invoice paid, payment failed, canceled).
- Your database as the source of truth: You store Stripe customer ID, subscription ID, and current status so your app stays consistent.
- Access gating in your app: You allow or restrict features based on subscription status and entitlements.
- Stripe Customer Portal (optional but recommended): Customer updates payment method, switches plan, downloads invoices, cancels.
Stripe’s own step-by-step blueprint for this is their guide to building subscriptions.
Step 1: Decide your pricing model before you touch the dashboard
This sounds obvious, but it saves weeks of rework.
Make these decisions up front:
- How many plans: Fewer plans usually convert better and reduce edge cases.
- Billing interval: Monthly, annual, or both.
- Free trial: If you offer it, decide how long, and what happens when it ends.
- Seat-based vs flat: Seat-based means quantity changes and proration become central.
- Upgrades and downgrades: Decide if changes take effect immediately or at period end.
If you want inspiration for packaging, this recurring revenue breakdown is a useful reference: subscription monetization models and examples.
Step 2: Create Products and Prices in Stripe
In Stripe, a Product is what you sell. A Price is how you charge for it (amount + interval + currency).
Best practice is:
- Plan modeling: One Product per plan (typical for simple SaaS), or one Product with multiple Prices (monthly/annual variants).
- Stable internal keys: Keep your internal plan IDs in your own system, and map them to Stripe Price IDs.
Key habit that prevents production bugs:
- Configuration discipline: Treat Stripe Price IDs as configuration. Store them in environment variables (or a config table), not hard-coded inside random files.
Step 3: Build a pricing page that creates a Stripe Checkout Session
Most subscription products start with Stripe Checkout because it is faster and more secure than building your own payment form.
Start on your pricing page by making the plan choice feel simple. Your goal is clarity: the customer should know what they get, what they will pay, and what happens next. When they click “Start plan,” they should feel like they are beginning a guided flow, not jumping into a confusing payment step.
Next, have your backend create a Stripe Checkout Session using the Stripe Price ID that matches the plan they selected. This server-side step keeps the system secure. It also lets you set the subscribing account and the return URLs.
Finally, redirect the user to the Checkout Session URL that Stripe returns. The expected outcome is straightforward: the customer completes checkout on Stripe’s hosted page, and Stripe becomes the system that attempts the charge and creates the subscription record.
What to include in the session:
- Mode: Subscription.
- Line items: The selected Price.
- Success and cancel URLs: Where the user returns.
- Client reference: Your internal user or account ID.
Important: do not “activate” the plan just because the user hit your success URL. Success URLs can be refreshed, shared, or triggered without payment completion in some edge cases.
You activate access when the webhook tells you the subscription is truly active.
Step 4: Store Stripe IDs in your database (so your app stays in control)
At minimum, store:
- stripe_customer_id: The Stripe Customer record.
- stripe_subscription_id: The Subscription record.
- plan: Your internal plan key (not Stripe’s).
- status: active, trialing, past_due, canceled, unpaid (you decide what statuses map to “access on”).
- current_period_end: For grace periods and messaging.
A simple access policy many SaaS products use:
- Active or trialing: Full access.
- Past due: Grace period access for a short window, then restrict.
- Canceled: Access until period end (if canceled_at_period_end) or immediate off (if canceled now).
Step 5: Use webhooks to grant and revoke access reliably

Webhooks are how Stripe tells your backend “this subscription is active now” or “this payment failed.”
Stripe lists the most common subscription events in their subscription webhook documentation.
In practice, you want to handle a small set of events well:
- checkout.session.completed: A good place to attach metadata, but still not your final “access on” signal.
- customer subscription lifecycle: customer.subscription.created / updated / deleted should update your subscription record and status.
- Paid confirmation: invoice.paid confirms the customer is paid up for the new period.
- Failure signal: invoice.payment_failed triggers your dunning flow (retry messaging and access changes).
Webhook implementation rules that prevent chaos:
- Signature verification: Verify the webhook signature. This blocks spoofed requests.
- Idempotent handling: Make handlers idempotent. A webhook can be delivered more than once. Your code should safely apply the same update again without double-granting or corrupting state.
- Operational visibility: Log and alert on failures. Silent webhook failures are subscription revenue leaks.
Step 6: Add plan changes and prorations without angry customers
Customers will upgrade, downgrade, pause, and change seat counts. Plan changes are where most DIY systems break.
Stripe prorations exist to charge fairly for partial periods. Stripe’s guide on prorations for subscriptions explains the logic and the controls.
Design choices you need to make:
- Immediate upgrade: Customer pays the difference right away, gets features now.
- End-of-cycle downgrade: Customer keeps current features until renewal.
Implementation advice:
- UI timing clarity: Be explicit about timing in your user interface (UI). Customers get upset when a downgrade removes features instantly.
- Cost preview: Preview costs before applying changes. Even a simple “you will be charged today” message reduces refunds and support.
Step 7: Give customers self-serve control with the Stripe Customer Portal
If you want fewer support tickets, add a billing portal.
Stripe’s Customer Portal documentation covers what customers can do, including updating cards, switching plans, and canceling.
Practical guidance:
- Payment method updates: Use the portal for payment method updates. It is a common failure point in subscription businesses.
- Invoice downloads: Use the portal for invoice downloads. Your customers will ask for invoices.
- Allowed changes: Decide what changes you allow. You can restrict which products and prices are changeable.
This is also a brand trust move. Customers feel safer when billing controls are clear and self-service.
Step 8: Handle failed payments with a calm, automated recovery loop
Failed payments happen. What matters is how fast you recover.
Build a simple system:
- Customer messaging: Use email plus in-app banners that clearly say “Payment failed, update your card,” and link to the portal.
- Grace period policy: Keep access for a short time while retries happen. This protects the customer experience while still keeping pressure on resolution.
- Escalation path: If the subscription becomes unpaid, reduce access and keep the path to restore it obvious.
Bulletproofing tips:
- Status-driven access: Use subscription status to drive access. Do not rely on “last payment date” alone.
- Automation first: Keep humans out of the loop. If you manually chase payments, the business will never scale.
Step 9: Test end-to-end before launch
Do not ship subscriptions without testing the full lifecycle.
You want to see:
- New subscription behavior: Trialing and active states behave the way you promise.
- Plan changes: Upgrade and downgrade billing and access changes behave as promised.
- Cancellation timing: Cancel now vs cancel at period end results in the access rules you intend.
- Failure and recovery: Payment failure triggers, your app restricts correctly, and portal updates restore access.
A helpful habit is to build an internal “billing status” admin page that shows:
- Tracking IDs: Stripe customer and subscription IDs.
- Current state: Current status (active, trialing, past_due, canceled, unpaid) and what it means for access.
- Webhook health: Last webhook received (event type plus timestamp) so you can spot delivery gaps.
- Renewal timing: Current period end for grace periods, upgrade messaging, and cancellation rules.
- Entitlements: Plan entitlements so support can see what the customer should have.
This single page can save hours every week once customers are live.
Building a subscription app fast without cutting corners
If you are a solo founder or small team, creating a subscription is usually the straightforward part. The bigger lift is the surrounding product plumbing: authentication, role-based access, admin controls, and a clean workflow for webhooks and plan gating.
That is where an AI-assisted build can change your timeline.
- Prototype the full flow: If you want to prototype the full flow quickly (pricing page, account area, entitlement logic, and a webhook endpoint), QuantumByte’s AI app builder is designed to turn natural language into working software in days.
- Extend when the edge cases show up: If you need deeper custom work, like a multi-tenant billing model, complex seat management, or hybrid subscription plus usage billing, you can also extend the build with QuantumByte’s team once the prototype proves demand.
Common mistakes with Stripe subscriptions
These are the errors that create refunds, churn, and late-night debugging.
- Activating access on the success URL: The success page is not a payment confirmation. Use webhook-confirmed status updates, then grant access.
- Not storing Stripe IDs: If you do not store customer and subscription IDs, you cannot reconcile billing problems quickly.
- Treating Stripe as your database: Stripe is the billing engine. Your database is where you define entitlements and product rules.
- Ignoring idempotency: Webhooks retry. Without idempotent handling, you will double-apply changes.
- Skipping self-serve billing: Without a portal, customers email you for basic tasks like updating cards.
Wrap-up: a Stripe subscriptions setup you can trust
A reliable Stripe subscriptions implementation is less about “charging a card” and more about building a system that stays correct as customers change plans, payments fail, and accounts evolve.
You now have an end-to-end approach:
- Plan modeling: Model plans with Products and Prices.
- Checkout flow: Use Stripe Checkout to start subscriptions.
- Billing data ownership: Store Stripe IDs and statuses in your database.
- Access enforcement: Rely on webhooks to grant and revoke access.
- Change management: Support upgrades, downgrades, and prorations cleanly.
- Self-serve retention: Reduce churn with a self-serve Customer Portal.
If you want to ship the full product around billing, not just billing itself, start from the plan and build outward. That is how subscription revenue becomes predictable, and how you buy back time to focus on your next leap.
Frequently Asked Questions
Do I need Stripe Billing to use Stripe subscriptions?
Yes. Subscriptions are managed through Stripe Billing. You can still use Stripe Checkout as the hosted payment experience, but the recurring subscription logic and invoicing are part of Billing.
Should I use Stripe Checkout or build my own subscription checkout?
For most early-stage products, Stripe Checkout is the best starting point. It is faster to launch and reduces security and compliance work. You usually build a custom checkout only when you need a very specific payment experience.
What webhook events are most important for subscriptions?
At minimum, handle subscription lifecycle updates and invoicing events so your app’s access stays correct. In practice, that typically includes subscription created/updated/deleted and invoice paid/payment failed.
How do I let customers cancel or change plans without support tickets?
Use the Stripe Customer Portal. It gives customers a familiar, secure place to manage billing details, switch plans (if you allow it), and cancel.
Can I build a full subscription SaaS without a big dev team?
Yes, if you keep the first version simple and focus on a clean subscription architecture. If you want to move faster, an AI-assisted build can get the core app, access rules, and webhook plumbing working quickly, then you iterate based on real customer demand.