
Procure to pay automation turns a messy chain of emails, spreadsheets, approvals, invoices, and payments into a single, trackable workflow. If you are a founder or operator, this matters for one simple reason. Purchasing chaos leaks time, creates surprises in cash flow, and makes it hard to scale without hiring more admin.
Below is a practical, step-by-step way to implement procure to pay automation without overbuilding or locking yourself into tools you will outgrow.
Procure to pay automation, explained in plain English
Procure-to-pay (also called purchase-to-pay) is the end-to-end process of buying goods and services, from the first request to the final payment.
IBM describes procure-to-pay as an end-to-end flow. It includes requisitioning, sourcing, purchase orders, receiving, invoicing, and payment. It also includes matching controls, which verify what was ordered versus what was received versus what was billed. NetSuite frames it similarly and emphasizes financial controls like standardized workflows and approvals.
Procure to pay automation means you build software-backed rules around that flow. The right people approve the right spend. Invoices get validated. Exceptions get flagged. Every step leaves a clean audit trail.
You typically automate P2P for three outcomes:
- Faster cycle times: Requests and approvals move through a defined path instead of sitting in inboxes.
- Better spend control: You can enforce who can buy what, from which vendors, under which budgets.
- Cleaner books: Receiving, invoices, and payments connect to the same transaction history, so reconciliation stops being detective work.
The end-to-end P2P workflow you are automating
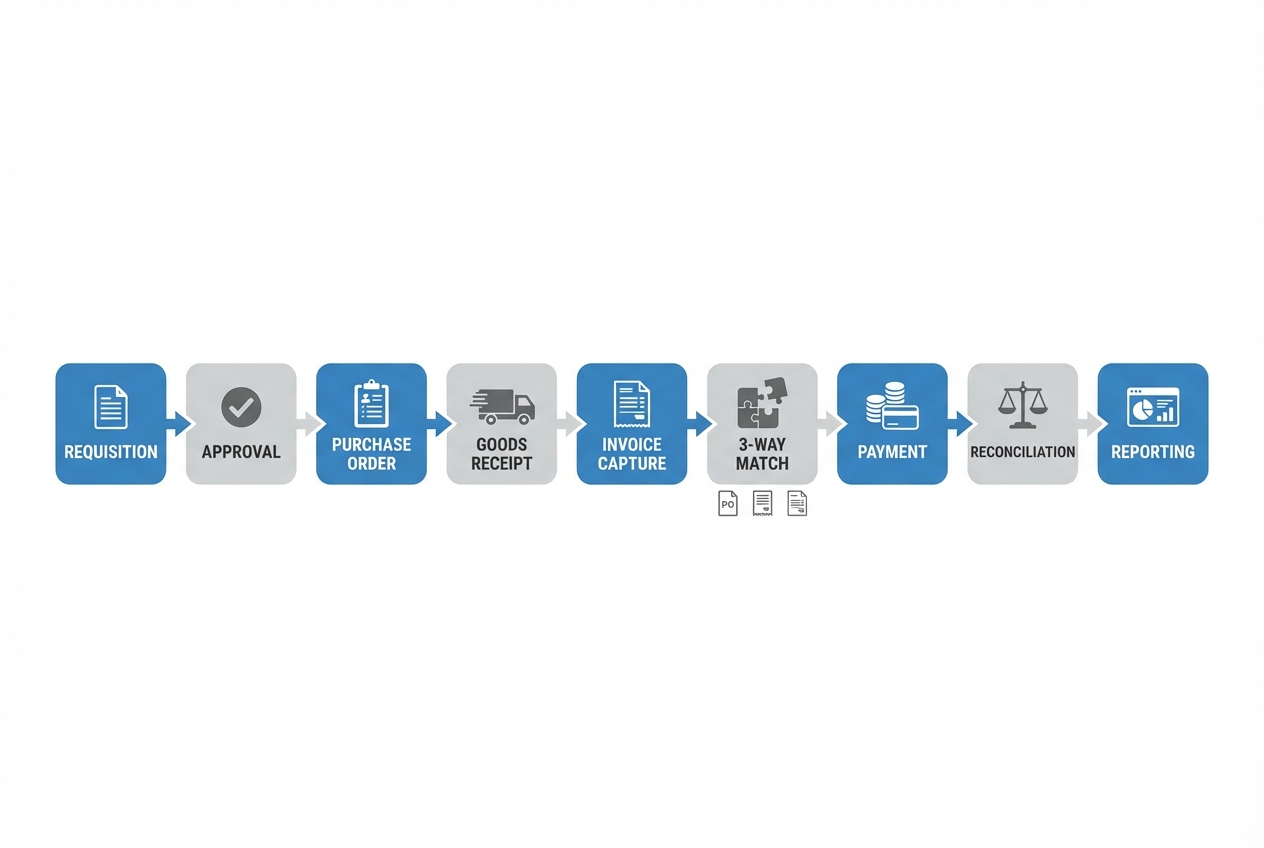 An end-to-end view helps you automate the full chain, not just invoices.
A solid procure-to-pay automation setup usually includes these stages:
- Requisition: Someone makes a purchase request with enough detail for a decision (what, why, cost, timing).
- Approval: The request gets checked against policy and budget, then approved or sent back with a clear reason.
- Purchase order: The approved request becomes a formal purchase order (PO) that the supplier can reference.
- Receiving: Your team confirms goods arrived or services were delivered, so you have proof before you pay.
- Invoice capture: Invoices arrive and get turned into structured data, not just PDFs sitting in an inbox.
- Matching: The system compares invoice details to the PO and receiving record, then flags exceptions.
- Payment: Approved, matched invoices move to payment on the right schedule and with the right controls.
- Reconciliation and reporting: Finance closes the loop and you get visibility into spend, bottlenecks, and exceptions.
That matching step matters if you want control. A common control is three-way matching. It cross-references the supplier invoice with the purchase order and the delivery receipt (or receiving report) before payment (NetSuite).
Step 1: Map your current process and decide what “good” looks like
Before you buy tools or build anything, map what is really happening today. Do not map what should happen.
Start with three short conversations. Talk to the person who requests purchases. Talk to the person who approves them. Talk to the person who pays invoices.
Then document:
- Where requests start: Email, Slack, a form, a shared spreadsheet, or “just tell me.”
- How approvals work: Who approves, what they look for, and what makes them reject.
- Where data lives: Vendor details, pricing, contracts, receipts, and invoice PDFs.
- Where failures happen: Missed approvals, lost invoices, late payments, duplicate requests, unclear ownership.
Define a simple “good” target state you can actually ship:
- Clear ownership: Someone owns each stage (request, approval, receiving, payment).
- Single source of truth: One system holds the current status of every purchase.
- Exceptions, not manual work: Humans handle edge cases. Software handles the normal flow.
If you want a broader automation roadmap beyond P2P, we wrote a guide on how to automate business processes to decide what to automate first and how to phase it.
Step 2: Standardize your purchasing rules (before you buy tools)
Automation makes your rules run faster. If your rules are unclear, automation will scale the confusion.
Write down your “non-negotiables” in plain language:
- Approval thresholds: Who must approve at different spend levels, and what counts as “high risk.”
- Preferred vendors: Which suppliers are approved, and when someone can go off-list.
- Budget rules: What budget fields must be provided, and what happens when it is missing.
- Receiving rules: Who confirms delivery, and what proof is required for services.
- Payment rules: Who can release payments and what documentation is required.
Keep it tight. You can refine later.
Step 3: Choose the right automation approach for your business
You have three practical paths. The best one depends on how complex your approvals are, how many systems you already use, and whether your process is a differentiator.
| Approach | Best for | Strengths | Trade-offs |
|---|---|---|---|
| Off-the-shelf P2P/AP tools | Teams that can adapt to standard workflows | Fast setup, known features, vendor support | You may bend your process to the tool; custom edge cases get expensive |
| ERP-first workflow | Companies already committed to an Enterprise Resource Planning (ERP) suite | Unified finance + purchasing data | Implementation effort; workflow changes can be slow |
| Custom workflow app + integrations | Founders who want a simple, exact-fit process | You build only what you need; your workflow becomes a scalable system | You must design it well and integrate it cleanly |
If your workflow is almost standard but not quite, custom can be the highest leverage option. QuantumByte' enterprise solution is meant to be a cheap and scalable way to get started.
If you want to tighten just the approvals layer first, this guide on approval workflow software can help you think through routing, escalations, and adoption.
Step 4: Automate each stage of procure-to-pay (a practical playbook)
This is the part most teams skip. They automate invoices, but leave the earlier steps messy. That is why surprises keep happening.
Use the stages below as a blueprint. Implement one stage at a time, and keep the scope small.
Requisition (intake): capture intent once
Your goal is to stop purchases from starting in five different places.
A good requisition form captures:
-
What is being purchased: A clear description and category.
-
Why it is needed: The business purpose.
-
When it is needed: This impacts shipping and vendor choice.
-
Expected cost and currency: Even if it is an estimate.
-
Vendor (if known): Or “needs sourcing.”
-
Budget and cost center: So finance can track spend.
-
Best practice: Use a single intake portal. It can be a lightweight internal app, not a giant procurement suite.
Approvals: route decisions to the right people
Approvals fail for two reasons. Rules are unclear. Ownership is unclear.
Automation fixes both by enforcing routing logic:
-
Policy-based routing: Route by amount, category, department, or vendor.
-
Exception routing: If something is off-policy, route to a different approver.
-
Time-based escalation: If an approval sits too long, nudge or escalate.
-
Expected outcome: Approvals stop being personal favors and become a predictable flow.
Purchase orders: generate a clean record for matching later
A purchase order is the reference point for the rest of P2P. If you do not generate a PO, matching and controls get weaker.
Automate:
-
PO creation: Build from an approved requisition.
-
PO numbering: Use unique IDs that show up on invoices.
-
PO dispatch: Send by email or through a supplier portal.
-
Expected outcome: Vendors get consistent documentation, and your team has a clear reference for receiving and invoicing.
Receiving: confirm delivery without slowing work
Receiving is where many teams assume the invoice is correct. That assumption gets expensive.
Automate a simple receiving step:
-
Goods receipt: Record quantity received and date.
-
Service confirmation: Confirm a milestone delivered, with a note or attachment.
-
Expected outcome: You can prove what you received. This makes matching fair and fast.
Invoice capture: stop retyping and stop losing invoices
Invoice automation starts with getting invoices into a structured format.
Common capture options include:
- Email ingestion: Use a dedicated inbox that parses invoice attachments.
- Upload portal: Let vendors upload invoices tied to a PO.
- Structured e-invoices: When possible, use standardized invoice formats so systems can read them reliably.
If you deal with structured e-invoices, it helps to know there are standards designed for interoperability. The European Commission documentation explains that the core invoice model in EN 16931 is a semantic data model defining business terms and rules for electronic invoices (European Commission).
- Expected outcome: You reduce manual entry and create consistent data for approvals and matching.
Matching: automate three-way match and surface exceptions
Matching is where you protect cash.
At minimum, automate:
- Two-way match: Compare invoice vs PO. This can work for services or simple spend.
- Three-way match: Compare invoice vs PO vs receiving report. This is a common accounts payable (AP) control (NetSuite).
Design matching to highlight exceptions, not block everything:
-
Tolerance rules: Allow small price or quantity variances if your policy permits.
-
Exception queues: Route mismatches to the right owner (buyer, requester, AP).
-
Expected outcome: Your team spends time on true problems, not on routine invoices.
Payment: pay on time, with separation of duties
Payment is where control either shows up or fails.
Payment automation goes beyond clicking pay. It adds safeguards that protect cash and reduce unauthorized payouts.
Automate:
-
Payment proposals: Suggest payments based on due dates and approved invoices.
-
Final approval: Add a separate approval step before funds move.
-
Remittance and vendor notification: Send confirmation automatically.
-
Expected outcome: You pay on terms, avoid rushed payments, and reduce the chance of unauthorized payouts.
Reconciliation and reporting: turn activity into visibility
Procure to pay automation should end with clarity, not more reports no one reads.
Start with simple reporting:
- Spend by vendor and category: See where money is going.
- Approval cycle times: Find bottlenecks.
- Exceptions: Track the top mismatch reasons and fix root causes.
If vendor data keeps breaking your process, you will get leverage from improving onboarding first. This guide on vendor onboarding automation maps out a clean workflow that reduces fraud risk and speeds up purchasing.
Step 5: Integrate, test, and control risk
Automation is only as good as its integrations and controls.
Integrations: connect the systems you already rely on
Most small teams run P2P across a mix of tools: accounting, banking, spreadsheets, Slack, and email.
Aim for:
- One master vendor list: Avoid duplicates and inconsistent naming.
- Consistent IDs: PO number, invoice number, vendor ID.
- Event-based updates: When a PO is approved, your accounting system should know.
Controls: build trust into the system
You want your process to be fast and defensible.
-
Segregation of duties: Separate who can request, approve, and pay. This reduces internal risk and makes audits less painful.
-
Role-based access: Limit who can edit vendor bank details, payment status, and approvals.
-
Audit trail by default: Every approval, edit, and exception should be time-stamped.
-
Expected outcome: You can explain any payment quickly, with evidence.
Step 6: Launch in phases, train lightly, and improve continuously
The biggest mistake is trying to automate everything at once.
Roll out in phases:
- Phase 1: Requisition + approvals. This alone reduces chaos.
- Phase 2: PO + receiving. This creates the backbone for matching.
- Phase 3: Invoice capture + matching. This is where AP work starts to shrink.
- Phase 4: Payment automation + reporting. This closes the loop and improves visibility.
Keep training simple. A short video plus a one-page “how we buy now” guide beats a long workshop.
Then iterate:
- Tighten rules: Add thresholds and exception routing once the flow is stable.
- Fix root causes: If mismatches keep happening, it is usually vendor data, unclear POs, or missing receiving.
Common pitfalls to avoid
- Automating a broken process: If approvals are unclear today, automation will just move unclear work faster.
- Over-optimizing for edge cases: Build for the 80% flow first, then handle exceptions with a queue.
- Skipping receiving: Without receiving, matching becomes guesswork, especially for goods.
- Treating P2P as “just AP”: The biggest leverage is upstream, where spend starts.
- No owner for exceptions: If mismatches do not have a clear owner, they become hidden backlog.
Turning P2P into a scalable system
Procure to pay automation helps you cut tool sprawl and turn purchasing into a repeatable system you can trust.
You covered:
- P2P basics: What procure-to-pay is and what automation changes.
- End-to-end workflow: The full chain, including matching controls.
- Implementation playbook: How to implement P2P automation step by step, from intake to reporting.
- Tooling choices: How to choose between off-the-shelf tools, ERP workflows, and custom apps.
- Scale-ready controls: How to keep integrations and controls clean as you grow.
If your next step is a custom-fit workflow that matches how your business actually runs, start by writing the process. QuantumByte will help you get clarity fast, and that clarity is what makes automation succeed.
Frequently Asked Questions
What is procure to pay automation?
Procure to pay automation is the use of software workflows to manage purchasing end to end, from purchase requests and approvals to purchase orders, receiving, invoice capture, matching, and payment.
What is the difference between procure-to-pay and accounts payable automation?
Accounts payable automation focuses on invoices and payments. Procure-to-pay covers the full chain, including requisitions, approvals, and purchase orders. P2P automation usually delivers better spend control because it starts upstream.
Do I need three-way matching for procure to pay automation?
If you buy physical goods, three-way matching is a strong control because it verifies the invoice against the purchase order and the receiving report before payment (NetSuite). For some services, a two-way match or milestone confirmation can be enough.
Should a small business use a full procurement suite?
Not always. If your process is straightforward, a lightweight workflow plus clean integrations can be enough. The right choice depends on how often you buy, how complex approvals are, and whether you need strict controls.
When does it make sense to build a custom P2P app?
A custom app makes sense when your approvals, budgets, and exceptions are specific to your business, or when your team wastes time jumping between tools. A fast way to explore this is to prototype the workflow and data model first, then decide what to automate next.