Building a customer portal is one of the fastest ways to turn service chaos into a system. When you learn how to build a customer portal the right way, you stop answering the same emails, you reduce back-and-forth, and you give customers a single place to log in, see status, pay, and get help.
A customer portal (also called a client portal or self-service portal) is a secure web app where customers can access their account, data, and workflows without needing your team.
How to build a customer portal: what you are actually building
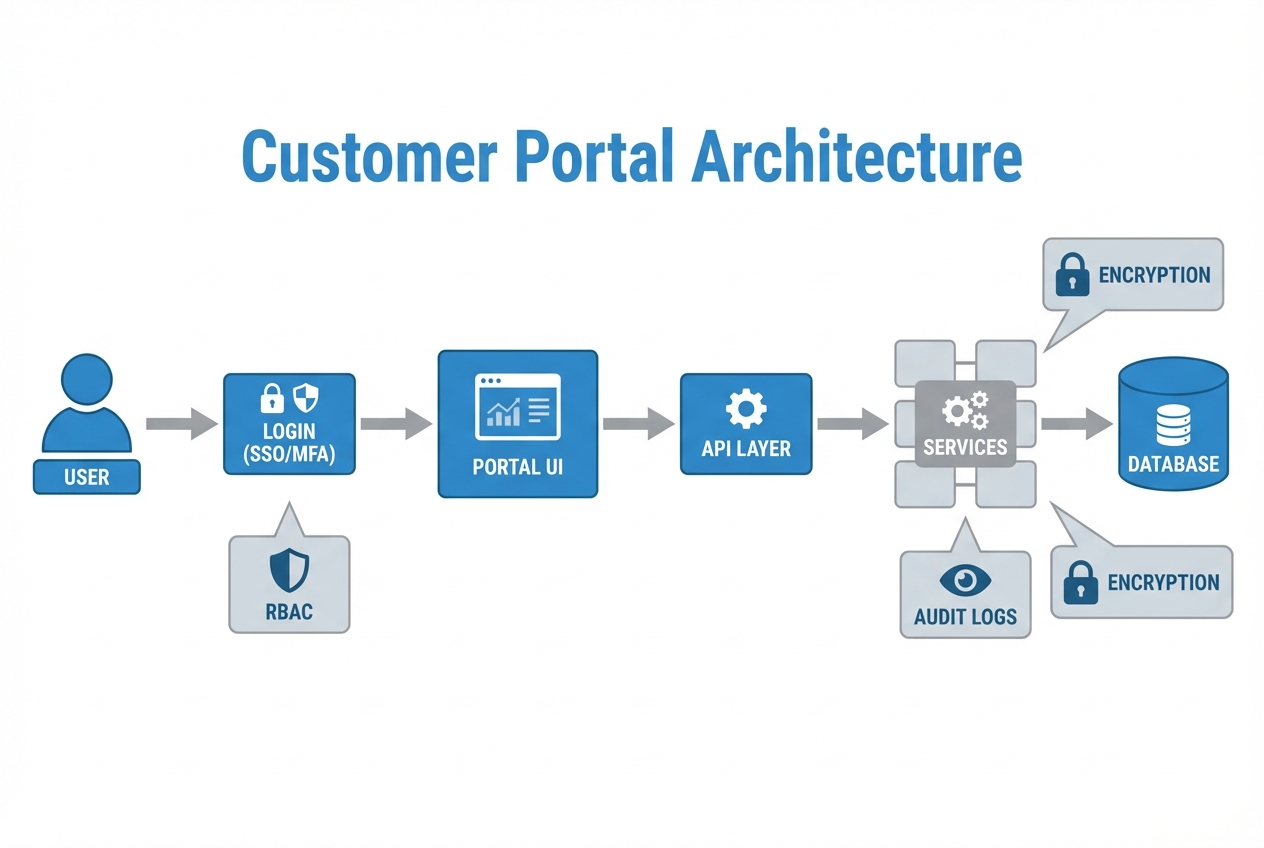
A customer portal is a product rather than just a simple dashboard. Your portal needs:
-
Identity: Login, password reset, multi-factor authentication (MFA), and sometimes single sign-on (SSO).
-
Permissions: Who can see what (role-based access control, or RBAC).
-
Core workflows: The 2 to 5 things customers come to do.
-
Data + integrations: Where the portal pulls truth from (your billing tool, project system, customer relationship management (CRM), database).
-
Trust: Security, privacy, audit logs, and reliable uptime.
If you want a practical mental model, think of your portal as "the front desk and filing cabinet" for your business.
Step 1: Define portal users, jobs-to-be-done, and success metrics
Most portals fail because they start with features. Start with people.
Define your user types. Common ones:
-
Primary customer admin: The person who pays, manages seats, and owns the relationship.
-
Standard customer user: The person who checks progress, downloads files, and raises requests.
-
Internal staff: Your team members who need to respond, update records, and troubleshoot.
Then define the portal’s "jobs" in plain language. Examples:
-
Status without email: Customers can see current status without emailing you.
-
Self-serve billing: Customers can pay or update billing details without a call.
-
Clean, complete requests: Customers can submit requests with the right info the first time.
Pick a few success metrics so you can prove the portal is working:
-
Deflection: Fewer "can you resend…" and "what’s the status…" messages.
-
Cycle time: Faster approvals, payments, or ticket resolution.
-
Adoption: Percentage of customers that log in weekly or monthly.
If your portal does not reduce a real bottleneck, it becomes another thing you maintain.
Step 2: Turn your vision into an MVP portal
An MVP (minimum viable product) portal is the smallest version that creates a real customer win.
A clean MVP usually has:
-
Secure login: A basic authentication flow that customers trust, including password reset.
-
Simple dashboard: A single place to see status, next steps, and recent activity.
-
One to two core workflows: The actions that remove your biggest manual workload first.
Use this table to decide what ships first.
| Portal area | MVP (ship first) | Phase 2 (add later) |
|---|---|---|
| Account | Profile, password reset, basic company info | Team management, SSO, advanced security settings |
| Billing | View invoices, download receipts, payment link | In-portal payments, usage-based billing, proration |
| Support | Create ticket, view ticket status | Knowledge base, chat, service level agreement (SLA) reporting |
| Files | View/download key files | Versioning, e-signature, collaborative folders |
| Reporting | Basic status and history | Custom analytics, exports, scheduled reports |
If you already know you want a billing and invoice experience, it helps to look at how self-service portals reduce invoice "resend" requests in accounts receivable workflows. This is a common portal pattern in accounts receivable automation software.
Step 3: Choose your build path (buy vs build vs hybrid)
You have three realistic options. The right one depends on whether your portal is a commodity or part of your differentiation.
| Approach | Best for | Trade-offs |
|---|---|---|
| Buy (portal inside an existing tool) | Simple needs, fast launch, low customization | You inherit the tool’s user experience (UX), limits, and pricing model |
| Build (custom portal) | Unique workflows, strong brand experience, competitive advantage | Higher initial effort, ongoing maintenance |
| Hybrid (AI-built MVP + dev team for edge cases) | Fast prototype with room to scale into "real software" | Requires clear specs and good product thinking |
If you are a solo operator or small team, hybrid is often the sweet spot. You get a working portal in days, then you invest in custom features only where they matter.
You can start with a clear spec today.
Step 4: Design the portal structure before you design screens
Information architecture is simply the set of pages and navigation that keeps customers from getting lost.
Start with 5 questions:
-
Primary sections: What are the 3 main sections customers will use, and why those win the most time back?
-
First post-login view: What is the first thing they need to see after login to feel oriented and confident?
-
Global actions: What actions should be possible from every page, like creating a request or getting support?
-
Hidden-by-design content: What should customers never see (even if they guess a URL), based on roles and tenancy?
-
Escape hatch: What is the "get help now" path when they are stuck, and how do you keep it obvious?
A simple portal navigation that works for many businesses:
-
Dashboard: A central view for status, next steps, and recent activity.
-
Billing: Where customers view invoices, update payment details, and download receipts.
-
Requests (or Support): A structured way to submit issues and track progress.
-
Files: A secure place to share and retrieve key documents.
-
Account: Profile, security settings, and company details.
Keep it boring. Boring portals get used.
Step 5: Plan authentication, roles, and security from day one
Security is not a "later" item for customer portals. You are giving the internet a login to your business.
Use these standards as your baseline:
-
OWASP Top 10: The OWASP Top 10 is a widely used reference for the most critical web application security risks.
-
OWASP ASVS: The OWASP Application Security Verification Standard (ASVS) provides a practical checklist of security controls to build and test.
-
NIST SP 800-63B: The NIST SP 800-63B Digital Identity Guidelines define concrete authentication requirements, including password guidance and session management.
-
GDPR Article 5: If you handle personal data in the European Union (EU), General Data Protection Regulation (GDPR) principles like data minimization and security ("integrity and confidentiality") apply. GDPR Article 5 is a clear reference point: Art. 5 GDPR.
Here are the portal security decisions that matter most.
-
Roles and permissions (RBAC): Decide what each role can do, then enforce it on the server, not just in the user interface. A good rule is "deny by default."
-
Multi-factor authentication (MFA): Add MFA for admin users at minimum. MFA means users prove it is really them using a second factor (like an authenticator app).
-
Session management: Use short-lived sessions and automatic logout for inactivity in higher-risk portals. NIST includes concrete guidance around session binding, reauthentication, and lifecycle management.
-
Audit logs: Record key actions like login events, file downloads, permission changes, and billing actions. Audit logs save you when there is a dispute.
-
Encryption: Use HTTPS (Transport Layer Security, or TLS) in transit and encrypt sensitive data at rest. If you store documents, treat them as sensitive by default.
-
Access control on every request: Never assume the front end will protect you. Every application programming interface (API) endpoint must re-check the user’s permissions.
If you are not sure how strict to be, pick a target like ASVS Level 1 for many portals, then raise it for portals handling payments, health data, or sensitive financial workflows.
Step 6: Model your data and integrations
Portals break when they show the wrong data. Your goal is "one source of truth."
Start by listing systems you already use:
-
Billing: Invoices, subscriptions, receipts, and payment links.
-
CRM: Contacts, companies, deal context, and account ownership.
-
Support: Tickets, request forms, and issue history.
-
Project tracking: Deliverables, milestones, and approvals.
-
Document storage: Files, folders, and sharing rules.
Then decide whether the portal will:
-
Read live from other tools: Pull data from each system via API so the portal always displays current info.
-
Sync to a portal database: Copy data into your own database for speed, reporting, or reliability, and keep it synced.
-
Use a mixed approach: Read some data live and store some locally, which is common when you need both speed and stability.
Key data objects to define early:
-
Customer (company): The business entity that owns the account and data.
-
User (person): The individual login attached to a customer.
-
Role (permissions): The rules that control what a user can see and do.
-
Invoice / payment: Billing records customers need to view, pay, or dispute.
-
Ticket / request: The structured workflow for support and service delivery.
-
File / document: Content shared through the portal with access rules.
-
Activity log: A record of actions for support, security, and troubleshooting.
If you want a quick win, start with a single workflow that pulls from one system of record. For example, a billing portal can start by showing invoices and payment links, then grow.
Step 7: Build the portal UX and workflows your customers will actually use
At this point, you know:
-
Target users: Who the portal serves.
-
MVP scope: What the MVP must do.
-
Security and data plan: How security and data will work.
Now build screens around real customer flows.
Common portal screens:
-
Login and account recovery: Login, reset password, verify email, and confirm MFA.
-
Dashboard: Next steps, status, and recent activity in one view.
-
Detail pages: Invoice detail, ticket detail, and file detail pages that answer questions fast.
-
Create flows: Submit a request, upload a file, or pay an invoice with minimal friction.
Design tips that raise adoption:
-
Make "next action" obvious: If a customer owes an invoice, the primary action should be "Pay." If you need info, the action should be "Upload" or "Answer questions."
-
Use plain language: Customers do not think in internal system names.
-
Show status with timestamps: "Submitted, in review, approved" with dates reduces support messages.
If you are building your portal with an AI app builder, your edge is speed. QuantumByte’s approach is to start from your written requirements and generate an app you can test with real customers quickly.
If you want the AI to nail the first version, it helps to understand how requirement prompts shape the app. This breakdown of how an AI app builder works will make your specs much sharper.
Step 8: Test the portal like a product
Testing is where "it works on my laptop" becomes "customers trust it."
Cover these layers:
-
Workflow testing: Create a test customer, run through the core journey end-to-end, and confirm it behaves the same every time.
-
Permission testing: Verify every role can only see what it should. This is where many portals fail.
-
Security testing: Check for basic issues aligned to OWASP Top 10 categories, like broken access control and injection risks.
-
Edge case testing: Duplicate submissions, interrupted payments, expired links, wrong email, and partial uploads.
A practical way to do this without a huge quality assurance (QA) budget is to define 10 to 20 "golden paths," then run them before every release.
Step 9: Launch, onboard customers, and iterate without chaos
Prioritize a controlled rollout for your portal launch. Keep it calm and deliberate.
-
Start with a pilot group: Choose customers who give feedback and want the portal.
-
Train with one short video: Keep it under 3 minutes. Show login, the main action, and where to get help.
-
Add "support in context": A help link on each screen beats a separate FAQ page nobody reads.
-
Track behavior: Log what customers click, where they drop, and what they search for.
Then iterate based on what customers do, not what they say.
If you sell your services in a repeatable way, consider whether your portal could become part of your packaged offer. Many agencies turn client portals into a product line. This guide to a white-label app builder shows the business model angles that make portals worth the effort.
High-impact modules to add next
Once customers are logging in and using the portal, add modules that multiply the payoff.
-
Billing upgrades: Add autopay, saved payment methods, and in-portal receipts.
-
Disputes and approvals: Create structured dispute flows so issues do not bounce around email.
-
Knowledge base: Turn repeated support answers into short articles inside the portal.
-
Automation hooks: Trigger workflows like "invoice paid" or "file uploaded" to update your other tools.
-
Collections workflow: If you handle overdue invoices, a portal can centralize statements and disputes. It is a common pattern in collections automation software.
Wrap-up: a portal that buys back your time
You now have a complete blueprint for how to build a customer portal that customers will actually use. You defined the users and jobs, shaped an MVP, chose a build path, designed navigation, handled authentication and security, planned data and integrations, and mapped out testing and rollout.
If you want to move faster than a typical build cycle, start by turning your portal idea into a structured spec. The fastest way to do is within the QuantumByte ecosystem, because it forces clarity before you write a line of code:
Frequently Asked Questions
What is the difference between a customer portal and a client portal?
They are usually the same thing. "Customer portal" is common in SaaS (software as a service). "Client portal" is common in agencies and professional services. Both mean a secure area where users log in to manage their account, requests, files, billing, or progress.
What features should every customer portal have?
At minimum:
-
Secure login: Email verification, password reset, and basic session protections.
-
Permissions: Users should only see their own company’s data.
-
One core workflow: Billing, requests, onboarding, or file delivery.
-
Support path: A clear way to get help when something breaks.
Should I build a portal or use an off-the-shelf tool?
If your portal is simple and matches what a tool already offers, buying is faster. If your portal is part of your differentiation, or it must match a specific workflow, custom build (or a hybrid approach) usually wins.
How long does it take to build a customer portal?
It depends on scope. A focused MVP can be built quickly when you keep the workflow tight and reuse standard components like authentication and billing integrations. The timeline grows when you add complex permissions, multi-tenant data models, and deep integrations.
Do I need single sign-on (SSO) on day one?
Not usually. Most MVP portals can start with email and password plus MFA for admins. SSO becomes important when you sell to larger organizations that require centralized identity management.
What are the biggest security risks in customer portals?
The most common risks are access control mistakes, weak authentication, and insecure data handling. A practical baseline is to align your build and testing with OWASP guidance like the OWASP Top 10 and ASVS.
Can an AI app builder create a portal that is production-ready?
AI can accelerate the first working version, especially for standard portal patterns. The key is having clear requirements and validating security, permissions, and data integrity. For edge cases, integrations, and "hard" engineering problems, you still want experienced developers involved.