An inefficient expense approval workflow creates a weird kind of chaos. It shows up as “Where is my reimbursement?”, “Can someone approve this?”, and “Why did we pay this twice?”
It also costs real money. A single manual expense report can cost a company nearly $60 and take 20 minutes of employee time. Multiply that by a growing team and you get the kind of admin load that drags your momentum down.
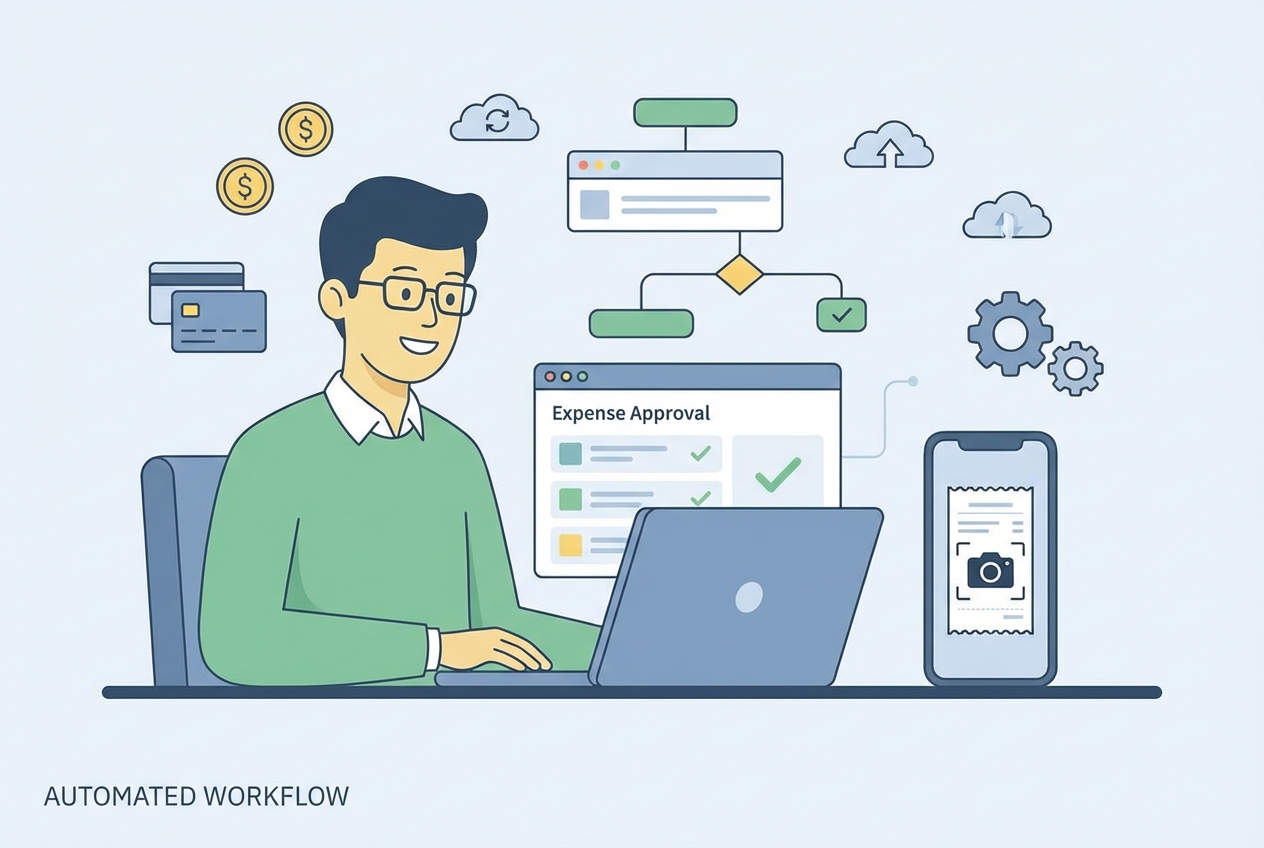
This guide breaks down the essential stages of a high-performing expense approval workflow and gives you a clear roadmap to automate it, from email threads and spreadsheets to a simple digital flow that protects your cash, and enforces policy.
What is an Expense Approval Workflow?
An expense approval workflow is the series of steps your business follows to review, authorize, and reimburse employee spending.
Think of it as your financial gatekeeper. It answers three questions every time:
-
Business purpose: Was this expense for the business?
-
Policy compliance: Does it follow your expense policy?
-
Proof and substantiation: Can you back it up with a receipt or invoice (plus a clear business reason)?
Small teams often start with spreadsheets or email. That works… until it doesn’t. Once you have multiple projects, managers, and categories, you need a real system to keep control without turning finance into a bottleneck.
If you are growing, it helps to treat this like a workflow design problem, not an accounting problem. That is where a formal workflow management approach matters.
5 Essential Steps in a Standard Expense Approval Workflow
Below is the core flow most businesses use. Your version can be simpler or more strict, but these stages show up almost every time.
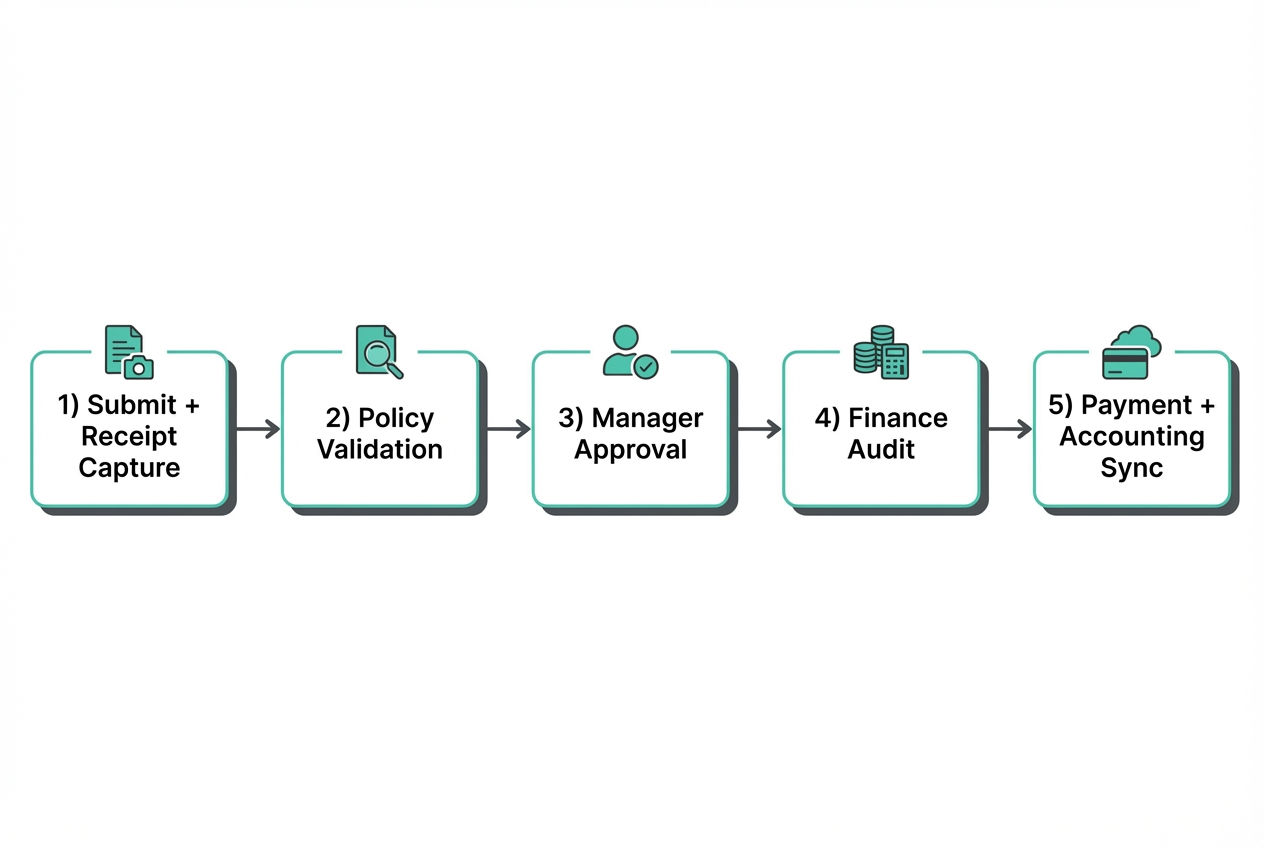
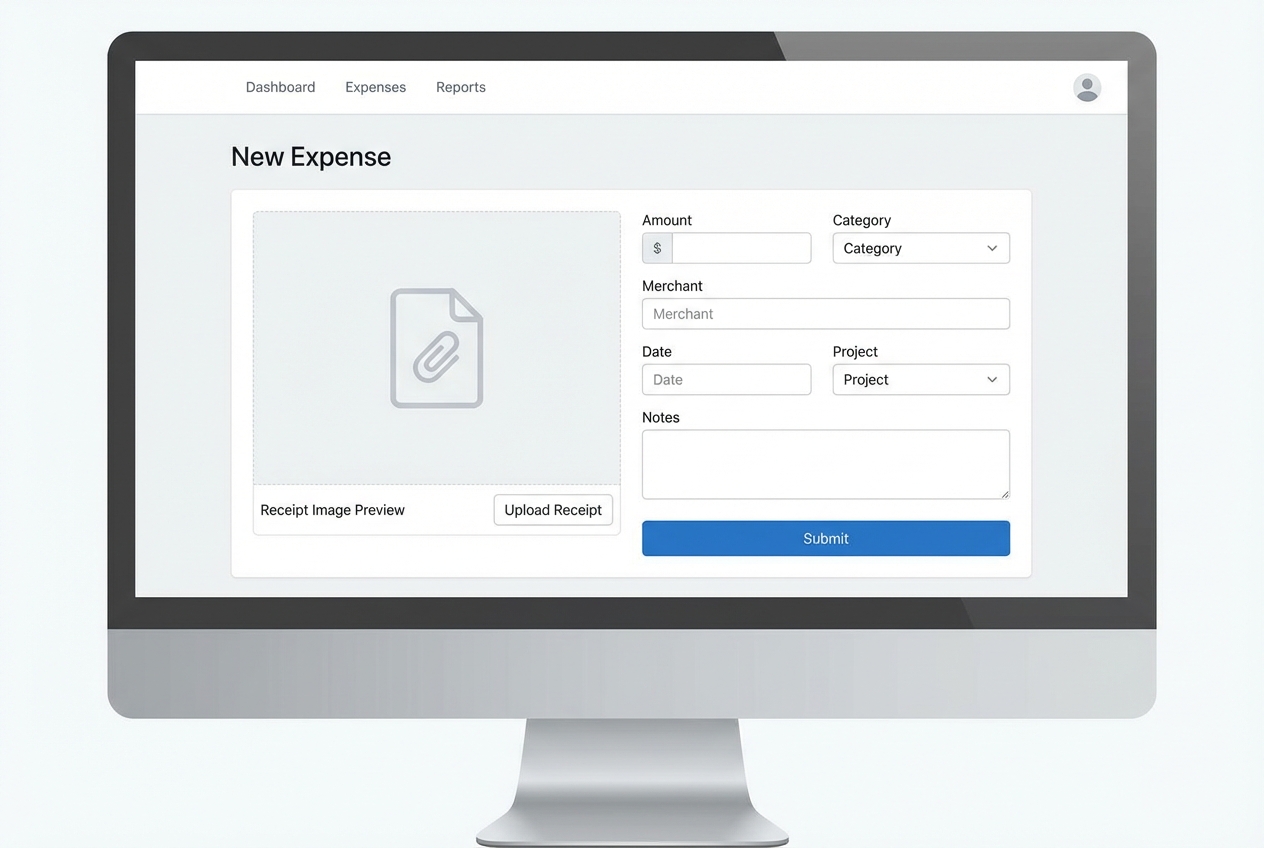
1. Expense Submission and Receipt Capture
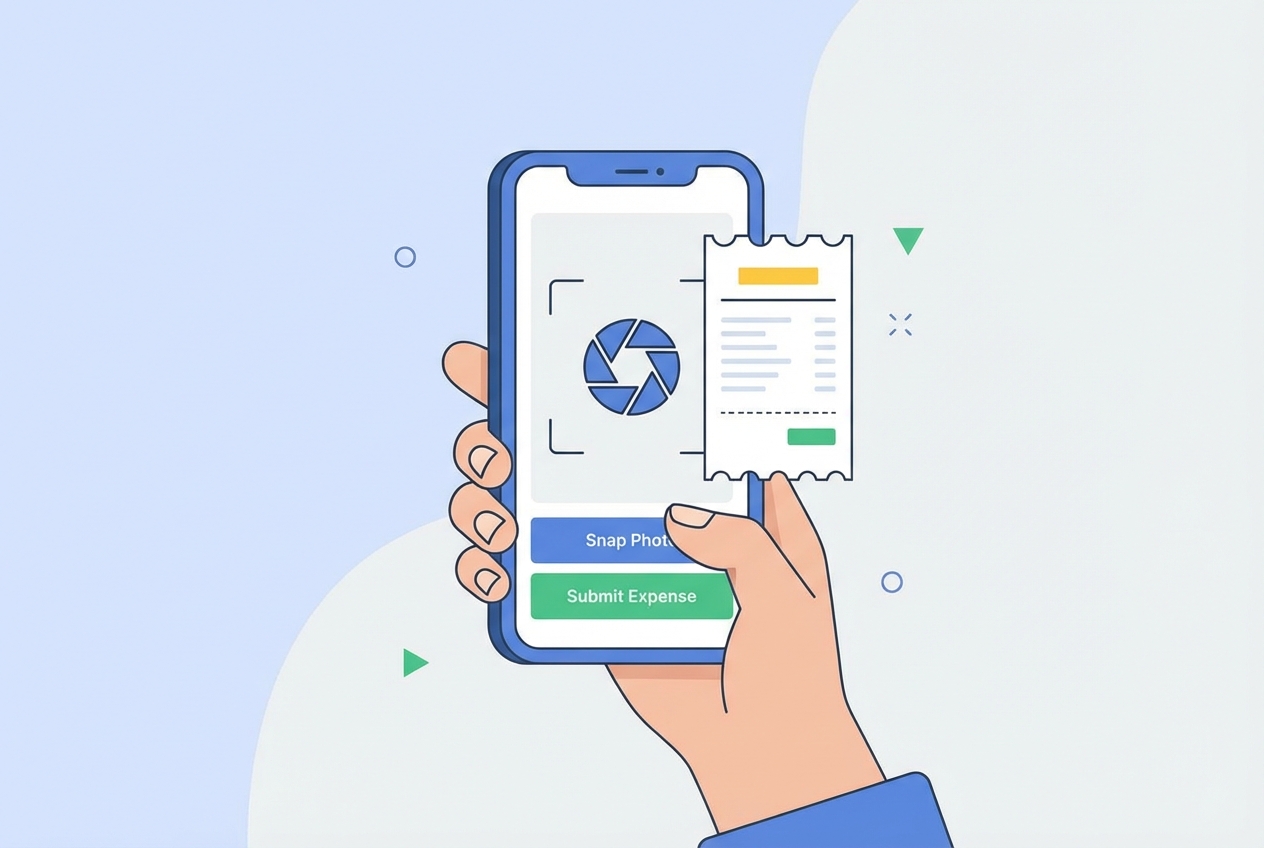
The journey starts with the employee. They submit an expense with key details:
-
Amount and date: The reimbursement amount and when the purchase happened, so you can match it to bank and card activity.
-
Merchant: Who the money went to (hotel, airline, software vendor), which helps finance detect duplicates and code correctly.
-
Category: Travel, meals, software, mileage, supplies, and so on, which drives policy checks and GL coding.
-
Business purpose: A short “why” that ties the spend to business activity, client work, or team operations.
-
Receipt or invoice attachment: A receipt image or PDF that proves the transaction and supports audits.
The big shift here is moving away from paper receipts and delayed entry. Mobile capture is the unlock because it happens at the moment of purchase.
2. Initial Review and Policy Validation
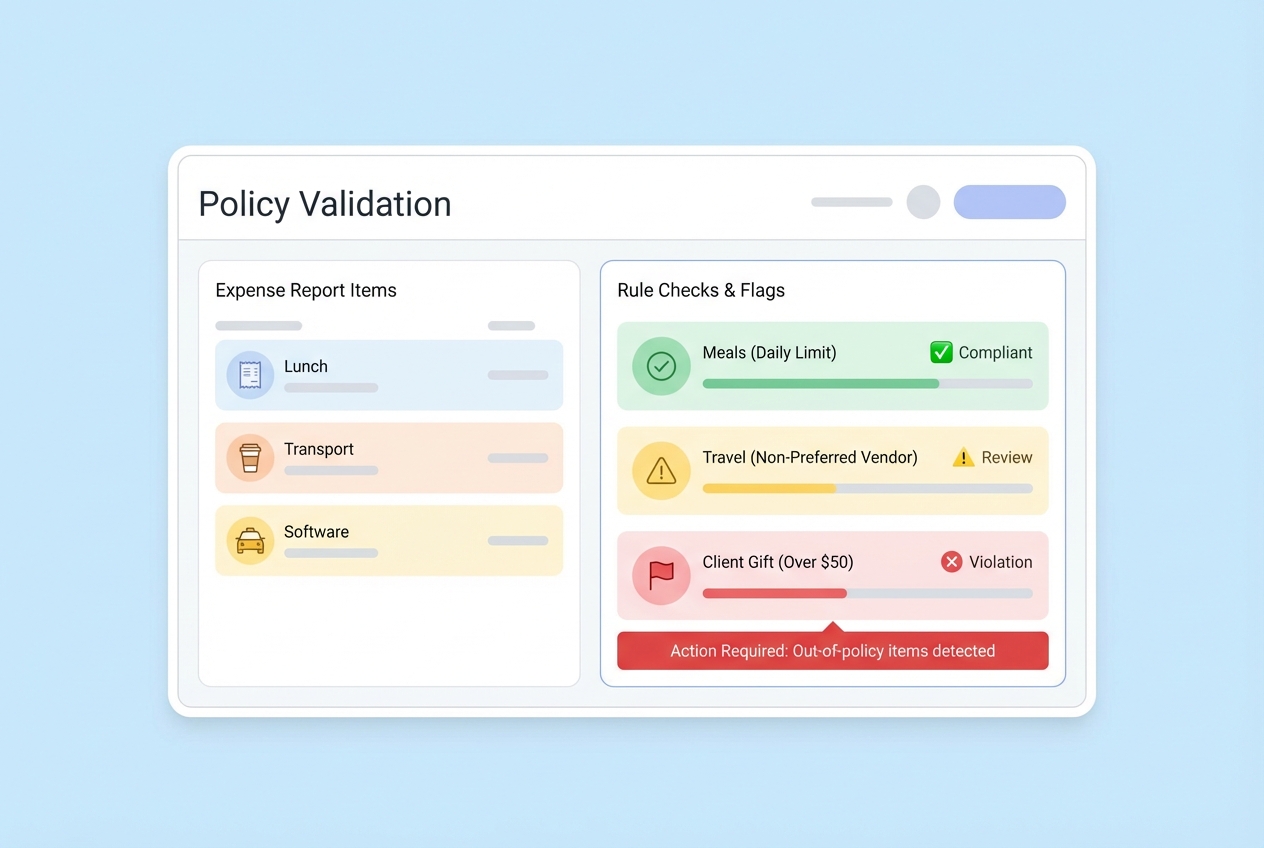
Next, the submission is checked against your travel and expense policy.
In a manual system, this means a manager or finance person scans for issues. In a modern system, the software can flag problems instantly:
-
Restricted categories: Flags alcohol, entertainment, or gifts when your policy disallows them or needs extra approval.
-
Limit overruns: Identifies meals, hotels, or mileage that exceed your spending caps or per-diem rules.
-
Missing documentation: Blocks or flags items with no receipt when a receipt is required above a threshold.
-
Duplicate submissions: Detects suspicious matches like the same merchant, same date, and same amount.
This step matters because it catches problems early, before they reach payroll or accounting.
3. Managerial Approval
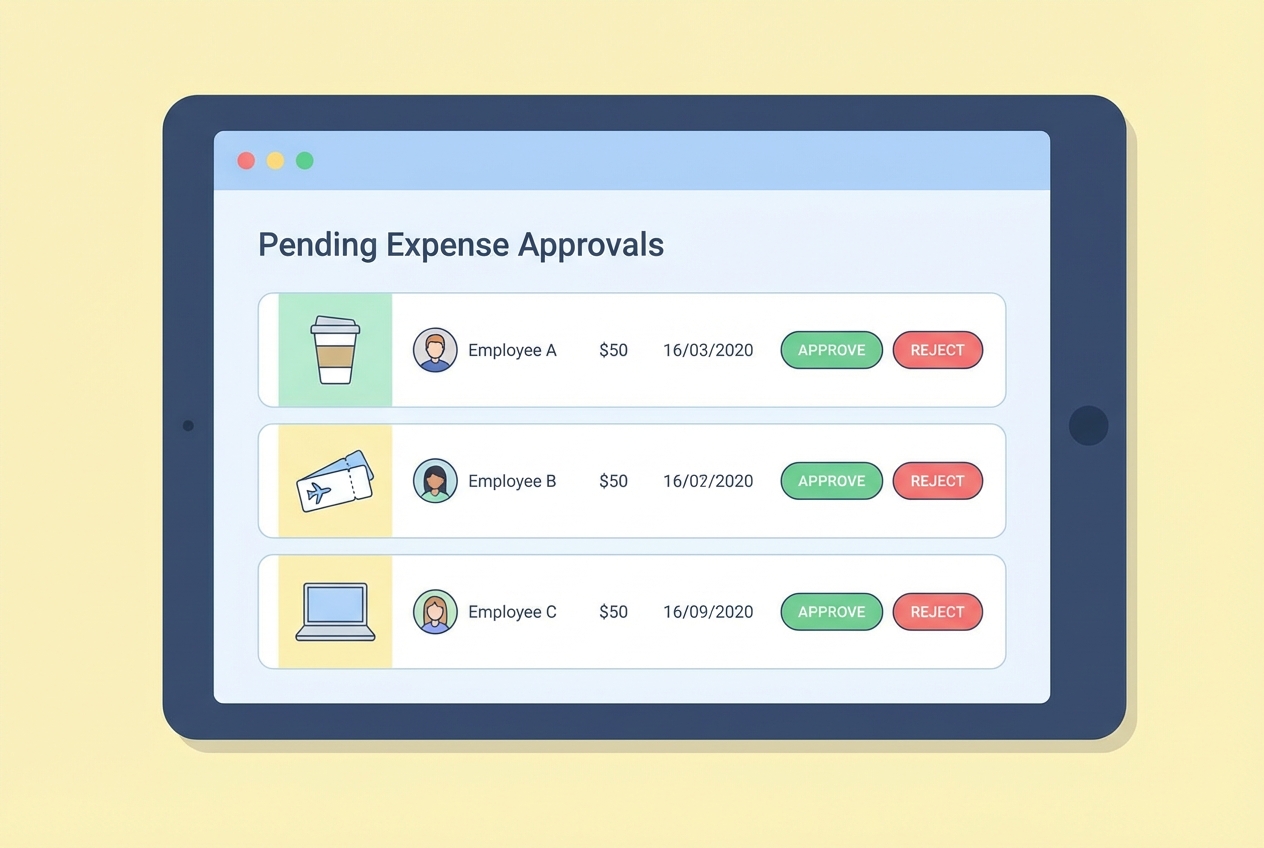
Now the direct supervisor (or project owner) approves or rejects the expense based on context.
This is where “business justification” lives. The manager is deciding if the spend makes sense for the project, client, or department.
In more complex orgs, approvals can branch. A marketing expense might route differently than a client travel expense. If you have cross-functional projects, approvals often need multiple stakeholders. That is a classic case for business process automation, where routing logic becomes a competitive advantage instead of constant friction.
4. Finance Department Audit
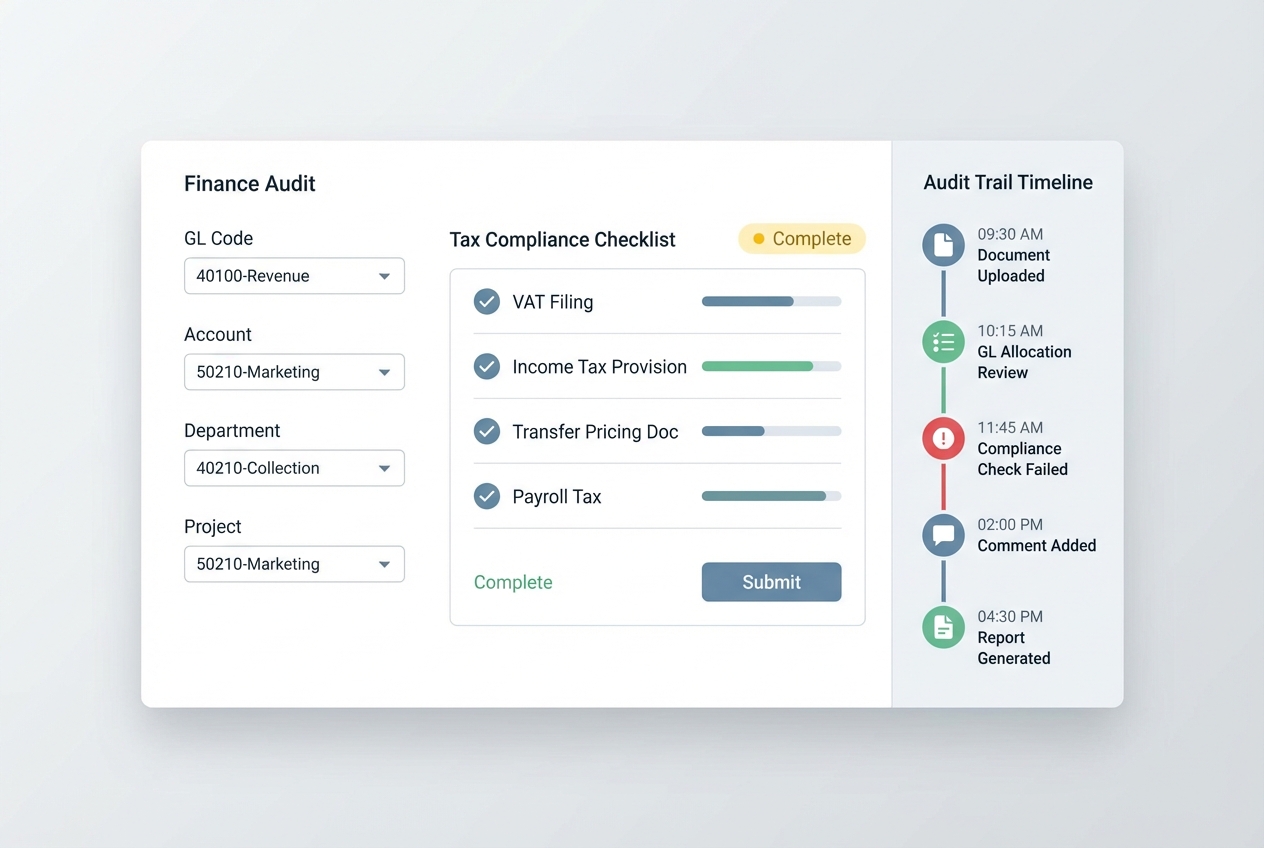
Finance performs final verification before money goes out.
Typical checks include:
-
GL coding accuracy: Finance confirms the right general ledger codes so your P&L and project reporting stay reliable.
-
Tax compliance checks: Finance verifies required fields (like location, date, business purpose) and local requirements where applicable.
-
Policy enforcement consistency: Finance makes sure similar expenses get treated the same way across teams and managers.
-
Fraud and anomaly spot checks: Finance looks for patterns like duplicates, suspicious merchants, or repeated “no receipt” claims.
This is also where weak workflows create hidden work.
For US-based companies, it is worth aligning your process with accountable plan rules. The IRS outlines reimbursement and substantiation expectations in IRS Publication 463 and the accountable plan framework in 26 CFR § 1.62-2.
5. Payment Processing and Data Sync
Once approved, reimbursement is triggered:
-
Payment channel: Paid via payroll, ACH, or accounts payable (AP), based on how your business handles reimbursements.
-
Payment timing: Sent on a set schedule (weekly, bi-weekly, or monthly) so employees know what to expect.
At the same time, approved expense data should sync into accounting. This is what keeps your P&L accurate and your forecasting honest.
Common Challenges of Manual Expense Approval Workflows
Manual workflows feel “fine” until you measure the damage. Here are the big failure modes.
-
Delayed reimbursements: Employees float company costs on personal cards. If you take weeks to pay them back, morale drops and complaints rise.
-
Human error: Manual entry leads to duplicates, wrong GL codes, and tax filing issues. One small mistake can ripple into months of cleanup.
-
Lack of visibility: Finance cannot see pending spend, so forecasts are off. Leaders think they have budget left when they don’t.
-
Compliance risks: Policy enforcement becomes inconsistent. Different managers approve different things, and that inconsistency invites both fraud and resentment.
How to Automate Your Expense Approval Workflow
Below is a step-by-step automation plan you can implement without turning your business into a “software project that never ends.”
Because this is a how-to guide, each step includes a visual so you can picture the setup.
Step 1: Select a Digital Platform (that fits your real workflow)
Your first decision is build vs buy vs “hack it together.”
What to look for:
-
Submission speed: If it takes more than a minute, people will avoid it.
-
Approvals routing: You need rules, not inbox chaos.
-
Integrations: Accounting, payroll, bank feeds, and Slack/email.
-
Audit trail: You should be able to answer who approved what, and when.
If your workflow is straightforward, an off-the-shelf tool can be enough. But many businesses have edge cases that matter: client billables, project-based approvals, per-diem rules, or multi-entity bookkeeping.
That is where custom software becomes a lever. If your existing tools do not match how you operate, consider custom software solutions that shape the platform around your business instead of forcing your business to shape around the platform.
If you are already losing multiple hours per week to expense admin, a tailored workflow usually pays for itself faster than you expect.
Step 2: Digitize the Policy (turn “guidelines” into rules)
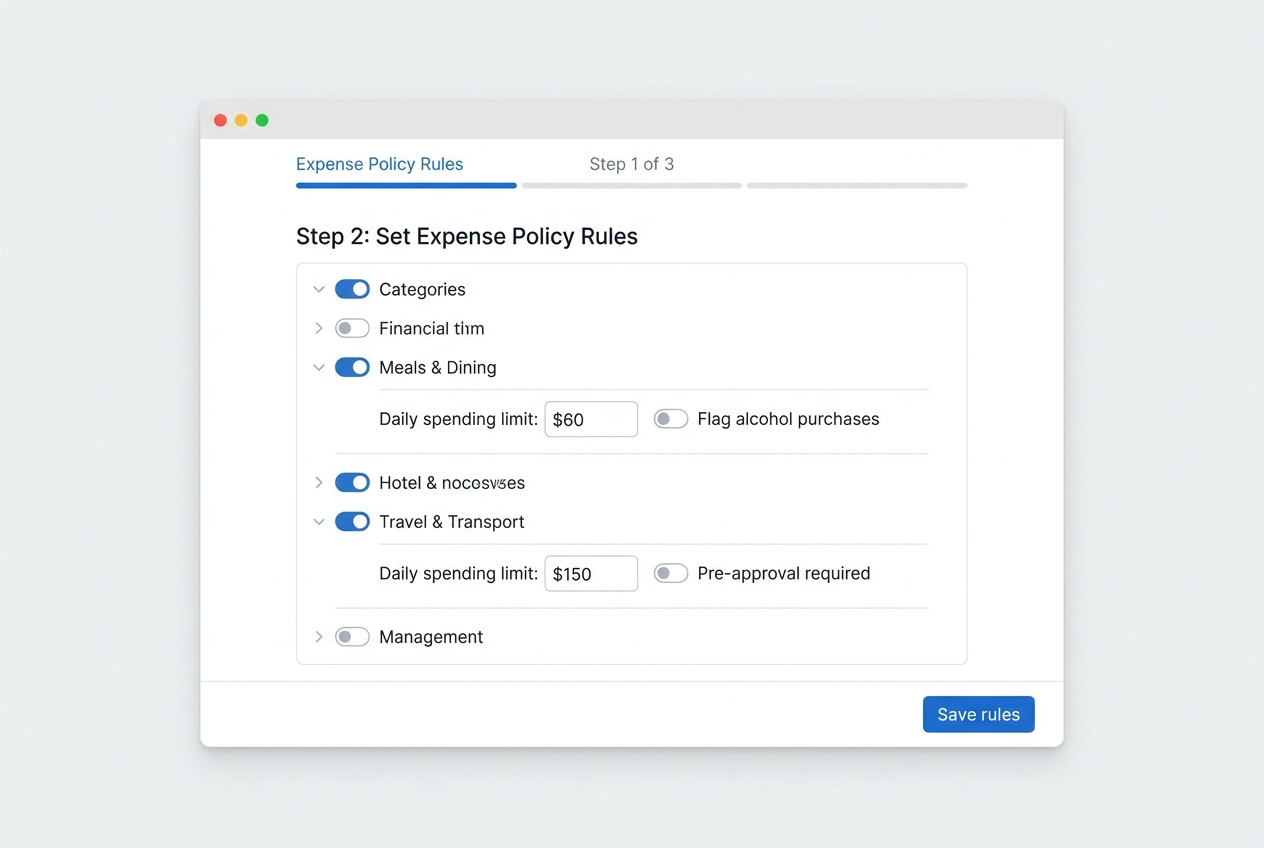
A policy that lives only in a PDF will not protect you in the moment. People need rules they can follow while they are buying, submitting, and approving.
Turn your policy into software rules like:
-
Meal limit rules: Set thresholds by region, city, or per-diem so you do not debate “reasonable” every time.
-
Receipt-required thresholds: Require a receipt over a set amount to prevent memory-based submissions.
-
Category restrictions: Block or flag categories like alcohol, entertainment, or gifts based on your policy.
-
Allowed merchants and subscriptions: Control recurring software spend by approving vendors, plans, or cost centers up front.
This is also where compliance gets easier. Accountable plan concepts depend on substantiation and documentation. When you bake receipt capture and business purpose into the submission flow, you reduce last-minute scrambling.
Step 3: Implement Conditional Logic (route approvals automatically)
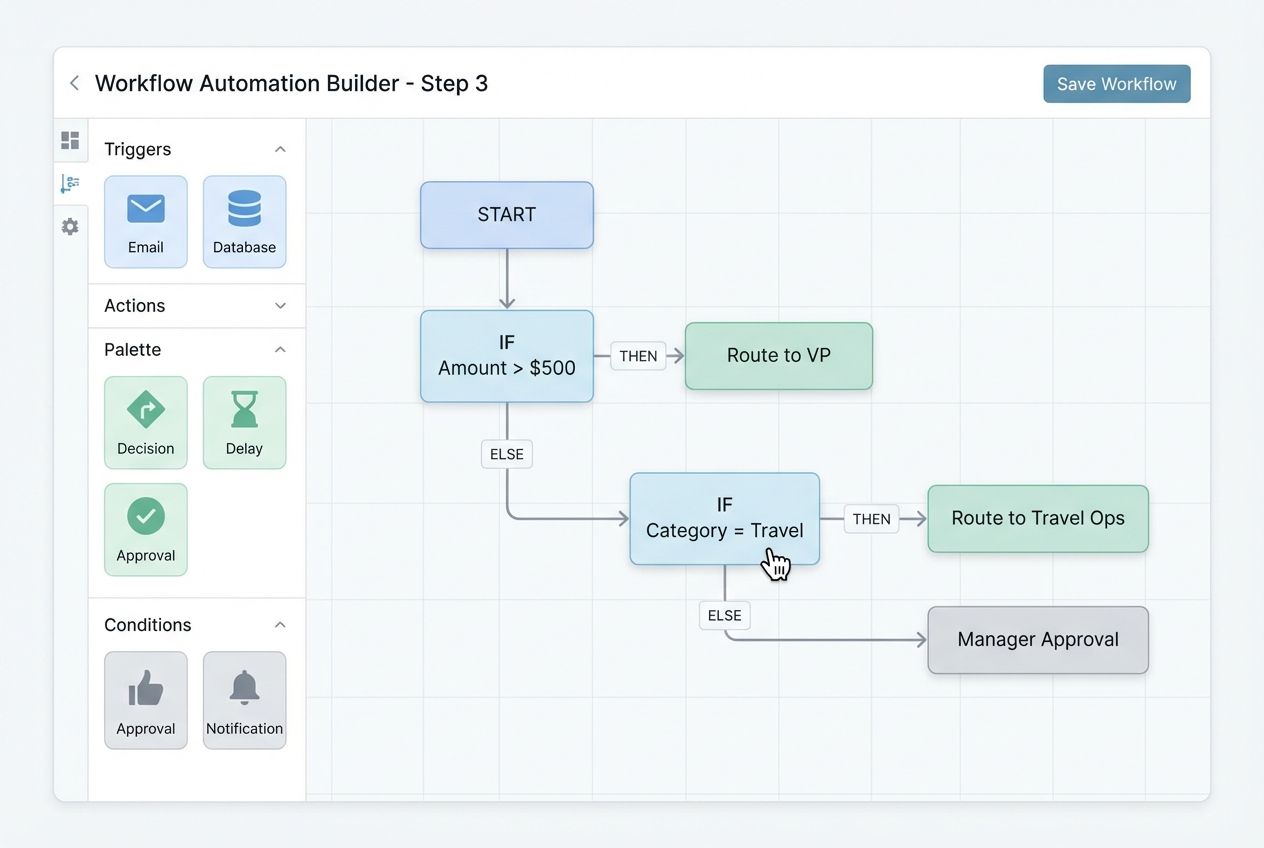
Conditional logic is the heart of automation. It is “if this, then that.”
Examples you can copy:
-
High-value expenses: If expense > $500, then route to VP for approval so larger spends get extra scrutiny.
-
Travel expenses: If category = travel, then route to a travel approver plus the employee’s manager so policy and business need both get checked.
-
Client-billable expenses: If client-billable = yes, then route to the project owner first to protect margin and billing accuracy.
-
High-risk policy flags: If policy flag = high risk, then route to finance before reimbursement so problems do not reach payroll.
Your goal is simple: keep low-risk spend moving, and put friction only where it protects you.
If you want to build this fast without months of engineering, a low-code approach can work well. Quantum Byte supports automation builds through low-code development when speed is the priority.
Step 4: Enable Mobile Accessibility (make compliance effortless)
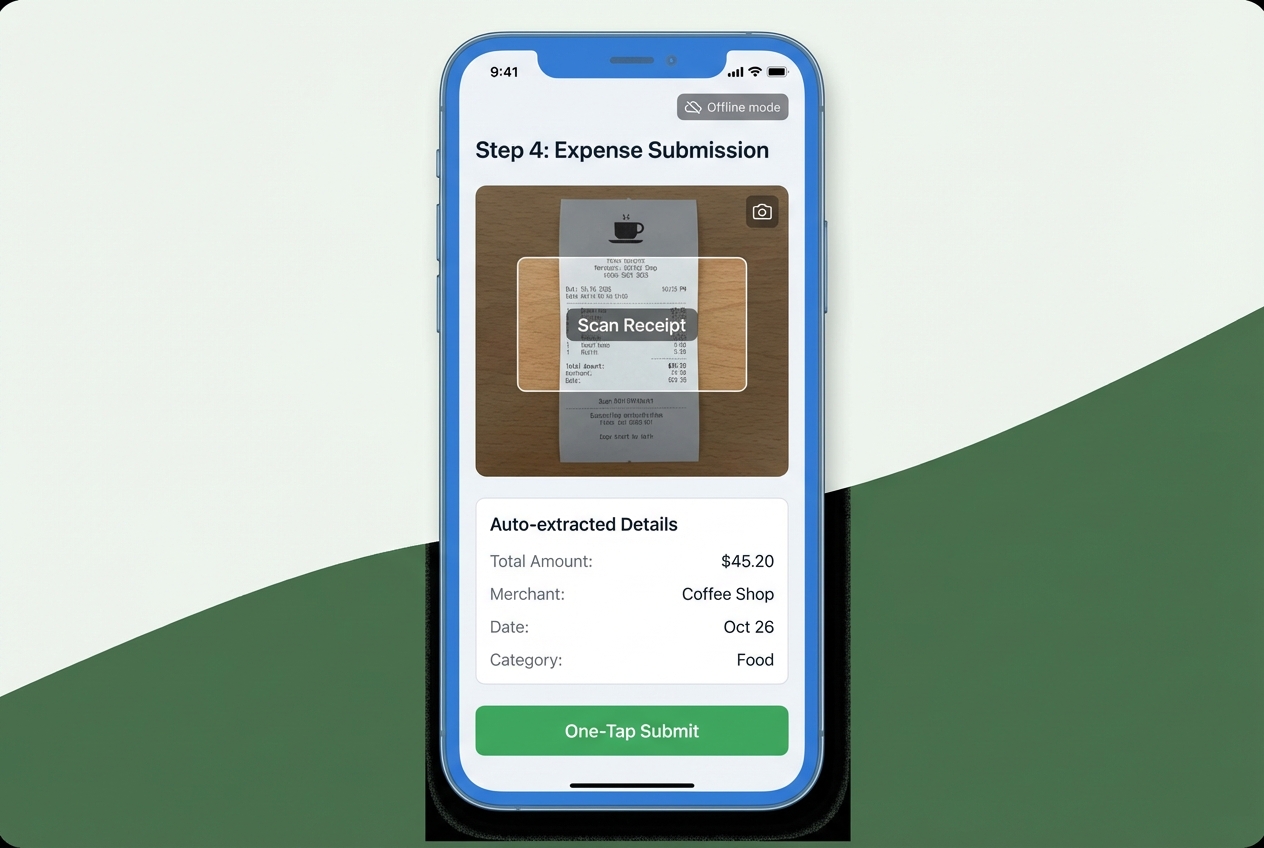
Mobile is not a “nice to have.” It is the difference between real-time capture and end-of-month guesswork.
Minimum mobile requirements:
-
Receipt photo capture: Let employees snap a receipt the second they get it, so documentation stays attached to the transaction.
-
Auto-extraction (OCR): Pull totals, dates, and merchants from the image so people do not have to type everything.
-
One-tap submit: Reduce friction so submission becomes a habit, not a chore.
-
Offline mode: Allow drafts and uploads later so airports and travel do not break compliance.
When your workflow is mobile-first, employees submit faster, managers approve faster, and finance audits cleaner.
Best Practices for Designing a Scalable Workflow
Automation is powerful, but design is what makes it sustainable.
-
Keep it simple: Too many approval layers slows everything down. Use strict routing only for high-value or high-risk categories.
-
Define clear timelines: Set an internal SLA. Example: managers approve within 48 hours. This alone can cut reimbursement time dramatically.
-
Centralize documentation: Keep receipts and approvals in one secure place. This prevents “lost proof” when someone leaves the company.
-
Continuous monitoring: Track average approval time, most common policy flags, and rejections. Fix the bottleneck, not the person.
Tip: If you care about a strong audit trail, treat logs like an asset. NIST offers practical guidance on protecting and reviewing logs in NIST SP 800-92.
Choosing the Right Expense Approval Software
Use this framework to decide what to implement.
What matters most:
-
Integrations: Connect to Slack/email, accounting systems, bank feeds, and payroll so you do not rebuild the same data in five places.
-
Flexible approval routing: Support conditional logic so approvals match your real org chart and risk levels.
-
Policy rules and real-time flagging: Catch out-of-policy spend at submission time, not after payment.
-
Audit trails and exports: Make it easy for finance to review, export, and defend decisions during audits.
-
User experience and adoption: If your team hates it, they will avoid it, and your workflow will collapse back into email.
Here is a simple comparison to ground the decision.
| Option | Best for | Pros | Cons |
|---|---|---|---|
| Spreadsheets (Google Sheets) | Very small teams, low volume | Cheap, fast to start | Manual errors, weak audit trail, slow approvals |
| Off-the-shelf expense tools | Standard workflows, mid-size ops | Quick setup, common integrations | Limited flexibility for edge cases |
| Tailored automation (custom or low-code) | Teams with unique routing, client billing, or legacy tools | Matches how you operate, reduces admin time, scales cleanly | Needs design effort and a build partner |
This is one place where Quantum Byte can be genuinely helpful. If you are stuck between legacy systems and modern workflows, Quantum Byte can help you design a tailored approval flow and build it quickly, then extend it with a dev team when you hit the tricky edge cases.
Frequently Asked Questions
What is an expense approval process?
It is the systematic review and authorization of employee spending requests to ensure they comply with company policy before reimbursement. A structured process protects the company from fraud and budget overruns.
How can I automate my expense approval workflow?
Automation is achieved by using expense management software or low-code automation tools to capture receipts, validate policy rules, and route requests to the correct approvers automatically.
If you want a fast path, you can outline your rules and approval paths and convert them into a working workflow. Quantum Byte often helps teams do this in days, not months, especially when you need custom routing or integrations.
What are the levels of expense approval?
Typically, there are three levels:
-
Direct manager: Validates business purpose and budget fit.
-
Department head or executive: Approves high-value or high-risk spend.
-
Finance team: Audits for compliance, coding, and payment readiness.
These levels should match your org chart and your risk tolerance.
Why is an expense approval workflow important?
It ensures financial accountability, prevents unauthorized spending, and provides an audit trail for tax purposes. Without it, companies risk losing thousands of dollars to overlooked errors or fraudulent claims.
Can I use Google Sheets for expense approvals?
While possible for very small teams, it is highly prone to errors and lacks the security and automation features needed for growth. Once approvals involve multiple people and categories, upgrading to a professional workflow solution is the safer move.